Thursday 27 December 2012

Getting Physical - Revamping a staircase

One common feature of late 19th Century middle class urban houses in Europe was the entrance staircase. In the usual manner of design, a kitchen and scullery occupied the streetside of the ground floor, the main reception rooms were therefore on the floor above the street level, the Bel Étage. Not one to conform, Horta took this "standard" and reinvented various aspects. Reorganising the groundfloor to give more space but also making the entry staircase a real feature piece. As one entered the building the double doors were swept open and the visitor was met with a stunning marble staircase lit from above by an ingenious light well, making it both light and welcoming, very different to the darkness often encountered inside the deep set terraced town houses.

It was always important to me to create that sense of welcome, the idea that you were entering something different. Though as in all my earlier attempts skills and tools both left me to make compromises.
This is a photo of the first version of the stairwell. This predates sculpts and is fully prim built. The brass coloured column in the middle is my low prim attempt at recreating the lovely column radiator that Horta installed to take the chill off of the stone stairwell.
The photo above shows the real life Maison Horta and gives an idea of what I am trying to achieve.

This is how it has looked for the past 3 or 4 years, the only significant change since the 2007 version was to replace the prim built stairs with sculpted ones (a real saving back then!). There are some significant missing details not least of which is the curved marble  detailing that forms the side of the staircase for the first few steps.

Today I rebuilt the stairwell using a combination of Mesh Studio and Blender. Blender was required for the curved marble that could not be produced from prims.
Here we have the 2012 version of the same stairwell. much closer in form to the original now with a proper mesh rendition of the radiator too and crucially, even with the separate meshes for the radiator and the curved marble, it still only incurs a land impact of 5 compared to around 15 for the previous version and closer to 25 for the original.

However the purpose of this blog was not simply to track progress but also talk about physics. There is a lot of confusion over physics in mesh and how to define it, but simply defining it isnot the end of the story either. By default once you import the physics is not actually enabled properly.

The default mesh physics is something akin to taking your object and stretching cling film over it. it will tend to stretch from one extremity to another and not follow the shape you have lovingly crafted. This is what is know as a convex hull. Any mesh when first imported whether you have defined a custom physics model or not appears to have its physics type set to convex hull.
Here we have the finished stair well ready to be deployed. We can use the viewer to help us see what the physics looks like for any given object. Make sure you have the debug/develop menu enabled and then select "render metadata" and tick the "Physics Shapes" option.
In the image above I have told the object to use the convex hull physics. This is selectable from within the features tab of the build menu and is labelled "Physics Shape Type". By default you may see only two options, "convex hull" and "none". As you can see the convex hull drapes itself over the mesh and is far from useful. If you select none then the object effectively becomes phantom and you can use the old fahsioned trick of invisible prims. However, there is a better way.

The better way, is to build your own physics model. Don't worry it is not scary and all you do in fact is exactly what you might have down with a sculpted prim and invisible prims. Create a model that matches the physics you wish to define. the simpler the better as each face will add to the physics cost of the mesh upload and therefore influence your overall LI.
In the photo above I am working on such a model. Note that I am only defining the surface that I want to be "physical", so ramps for the stairs are that bare minimum. I have also chosen to go crazy and define some physical presence for the columns and other decorations. Everything that would never be reasonably expected to be touched by an avatar can be made invisible. Once you have made this model drop the Mesh Studio script into it, set the settings to the lowest level and make your mesh.

The physics mesh is applied at upload time and cannot be tweaked later, it is important (and I discovered this the hard way) to ensure that the bounding box of the physics matches the bounding box of the model. If there is any disparity when the model are overlaid they will no marry up properly.

Now let's look at the results of applying a custom physics mesh using the viewer tools again.
In order to see a custom physics mesh we have to tweak the physics type setting again as before. If your mesh has a custom physics mesh included then you should now have a third option available "prim". This may seem rather obscure and I would agree, however selecting "prim" as the physics type, enables the physics map defined in the mesh model. As you can see the physics mesh perfectly matches the model I made and has been overlayed on top of the visual mesh. The result is nice sloping stair ramps and a few extra details.

Hooray.

I hope this helps a little, to explain the peculiarities of mesh physics.
Be careful mesh can be slippery at times.


Revisiting an earlier project - Chimney stack 2012 and some history

Those who know me inworld will know that my home "Maison Horta" has been around for over 5 years now in some form or other. Over on my flickr account you can find various images from the original construction phase. It was a tough project, I'd never used Photoshop and barely had I joined more than a handful of prims together.

One of the external features that vexed me at the start was the chimney stack. Through limited photographic evidence and drawings I had a good idea what was needed but on a tight prim budget (I had only about 400 prims for the entire build back then) with no sculpties it was going to be ugly. A complex arrangement of varying heights made it costly to reproduce and so I compromised with a two prim construct each textured, and it *was* ugly.

2 years later I gave in to my general concerns about LOD in exteriors. Babbage is often shot as a series of long sweeping rooftop views, I did not wnt to be the one with the large egg on the side of her house but when the use of RenderVolumeLOD debug setting became more common knowledge and practice amongst photographers and visitors this was less of a concern. I built the basic stack from prims using SculptCrafter, the result was a definite improvement but far from ideal, as it always looked a little awkward, catching the light in peculiar ways...

And so it was that the chimney was one of my first ever Mesh projects using the wonderful Mesh Studio. Even before I had a play with the Roycroft lamp featured in earlier blogs I took the SculptCrafter prim buil;t model, ripped the SC scripts out and dropped in the Mesh Studio one. The result was much better, a far neater looking object, with better LOD behaviour and lighting. Being the first project I had undertaken I knew little to nothing about levels of detail, about hidden geometry and about a number of the Mesh specific nuances that I take for granted now. The result was a very acceptable but overly costly (2 LI) and somewhat plain.


Not feeling much like undertaking a large task I decided to re-examine the chimney and see if I could reduce the LI, improve the LOD and add some depth by using fake shadow prims inside the openings.

The first task was to dig out the old model and update it. The purple material here will represent the sootier inside faces of the chimneys. You can also see a hint of a black material too. This is a the material that will form the shadow layers.
Shadow layering is an effect I sused in the 2011 RFLSL New Babbage winter city build to add the perception of depth and shadows to the viaduct and other tunnels. The effect is simple to achieve and remarkably effective.
The image above shows the effect a little more. I am experimenting a little here with an angled shadow.
The shadow prim is a stack of semi transparent (I typically use a dark smokey texture) texture faces. In the past I used planar sculpts with each set of four vertices forming one layer of shadow, if each layer is 4% opaque then by the time you stack 10 layers you have a fairly dark (~40%) shadow. In a tunnel, having these layers through the entire length allows you to control how far ahead the user can perceive things making the darkness seem all the more real.

In mesh the same can be achieved in much the same manner. For the sake of experimentation I decided to make it possible to cam down the dark chimney, without the shadows, SL would simply display large empty holes.

Back to the chimney...

One of the issues before was that I had left a lot of hidden geometry in the mesh. Hidden geometry is mesh vertices and surfaces that do not really exist but are a by product of using Mesh Studio and building form prims. Mesh Studio will not create Mesh for points that the fully transparent. therefore, it is a good habit to remove all the hidden mesh faces by making them transparent.

By far the easiest way to do this is to highlight the entire object and make it completely invisible.
The image above demonstrates this. If you look closely (or check the full size image on my flickr) you can see that the Mesh Studio script is tracking my progress and tells me that there are 310 prim faces of which 310 are hidden.
Now, using whatever method you prefer, select visible faces and set their opacity back to normal.
As you can see, just because I am building it does not stop me from dressing festively. I just take extra care not to catch my dress on sharp edges, or spill texture paint on me.

The process can take a while, especially on a complex object. I use ctrl-alt-t to reveal hidden, and then using select face slect a bunch, set them to visible and repeat until I can see no unwanted red.
Here I am part way through the process and the Mesh Studio script is telling us that we still have 248 faces hidden. The more the better, the idea is to only reveal those that absolutely need to be seen.
Once we are finished we can create our mesh and install it.
And here we have the Maison Horta chimney stack 2012. It is now reduced to 1 LI and has the improved texturing to the inner surfaces and proper holes you can cam down. Beware of urchins.
There is a 2013 project evident though. the external texture is rather lacklustre, either some more materials to add some variation to the texturing or a fully baked texture are in order...

Have a good New Year everyone.

Tuesday 31 July 2012

When is a prim not a prim?

When it's a mesh enabled sculpt....

In previous blog posts I used mesh studio to convert prim built objects into mesh. This ability alone makes for a very convenient and powerful tool, but it effectively places you back in 2007 with respect to the shapes that you have at your disposal. Mesh Studio is extremely good at dealing with prims claiming to be able to convert any conceivable torture into the appropriate mesh, but what about all those occasions where a prim no matter how set upon and tortured it may be, simply will not give the desired results?

One option is to forego the inworld tools and head to Blender or your chosen outworld 3d editor. We will examine this option and the times it makes sense in a future post but for now we will examine another tool that the intrepid Mesh Studio creators have slipped into your toolbox.

We have for many years enjoyed the benefits of sculpted prims, which before mesh gave us much more freedom in the shapes that we built, so much so that many of us depend upon the sculpted to prim for many of our creations. Recognising this dependency, and of course recognising the gaggle of devoted Sculpt Studio owners out there, TheBlack Box and his team have come to our rescue by linking sculpts from Sculpt Studio to mesh studio allowing them to become building blocks in your mesh masterpieces.


With your Mesh Studio package you will get an object called "SS2MS DropBox". This clever little box of tricks can be rezzed near to your build area. When you need a non-prim building block for your mesh, and especially if you happen to have created such a thing in the past, you need only rez the Sculpt Studio platform, build the item you need, or recreate it from a stored notecard and upload the resulting sculpt texture.


You then simply drop the new texture into the drop box and let it do the work for you. What happens next is rather clever. The dropbox associates the uploaded texture with your recently created artefacts on the SculptStudio server, assuming it finds a match (you should be sure to use a sculpt map generated within the last few hours), it will create a permanent link between that sculpt map and the mesh it represents.
 Any prim in the Mesh link set that has a recognised sculpt map will be converted to the appropriate mesh representation and incorporated in the overall mesh. What is more, so long as that sculpt map is sold with the appropriate permissions (full perm) you can even give/sell it to fellow Mesh Studio users as a component.

The images here were just a couple of random shots taken during a current Mesh project to update one of my oldest builds. I'll cover some of that project in later posts I suspect, but for now here is a glimpse of just one fo the many places where the above, very simple, sculpt has been used in a final mesh.


Tuesday 26 June 2012

Too much information

Too much information running through my brain, too much information driving me insane. - The Police.
Level Of Detail (LOD) seems to vex us and yet it can be quite hard to find out exactly what it is. In previous entries we established that in Second Life there are 4 LOD levels, this applies to all objects, prim, sculpt or mesh though the standard prims are very "LOD resistant." LOD resistant is a term used to convey the ability of an object to remain visibly intact at lower LOD levels. In sculpt maps this was achieved by making sure that key "structural" vertices were reinforced by ensuring that vertex with those coordinates appeared in each of the reduced sculpt map images. With Mesh we have to control this ourselves as shown in the last blog.

But when does one LOD get shown as opposed to another?
The best answer I have found to this is still asserted to be an approximation but it's close enough to work with.
The LOD boundaries can be approximated using the following equations.

Medium LOD = r/0.24
Low LOD = r/0.06
Lowest LOD = r/0.03 

where r is the "radius," determined as being the distance from the centre of a prim to one corner of the bounding box of the prim.
(Bounding box is a theoretical box of the same dimensions as the object.)

Thus if for a given object r is 10m then it will display the high LOD until the viewer is about 10/0.24 or ~42m away. After this, the medium LOD will appear and then the low LOD when the camera has withdrawn to 167m. Finally, the lowest LOD will appear at 333m. Which the observant will note is a fair way across the next door sim.

Clearly, a smaller object with a value of r of say 1m will have a different set of LOD boundaries. (4, 17m and 33m respectively). 
Ignoring mega prims, for now, the largest object we can have is 64mx64mx64m. This would have an r value of ~45m. The high LOD for this would be visible all the way out as far as 187m.

The fact that the highly detailed mesh is visible across most of the sim is the basic reason why larger mesh objects have a higher Land Impact penalty applied to them.

To close this post and draw a line under the LOD discussions for now, here are a series of images comparing the carefully LOD controlled mesh lamp with the standard sculpted lamp. To be fair to sculpt aficionados, though, there is not attempt in the sculpt to harden it against LOD.
High LOD - Mesh on Left (LI=1) , sculpt+prims on right (LI=5)

Medium LOD - Mesh on Left (LI=1) , sculpt+prims on right (LI=5)

Low LOD - Mesh on Left (LI=1) , sculpt+prims on right (LI=5)

Lowest LOD - Mesh on Left (LI=1) , sculpt+prims on right (LI=5)


Friday 22 June 2012

Less is more, more or less

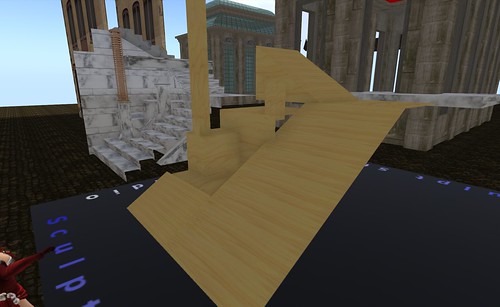
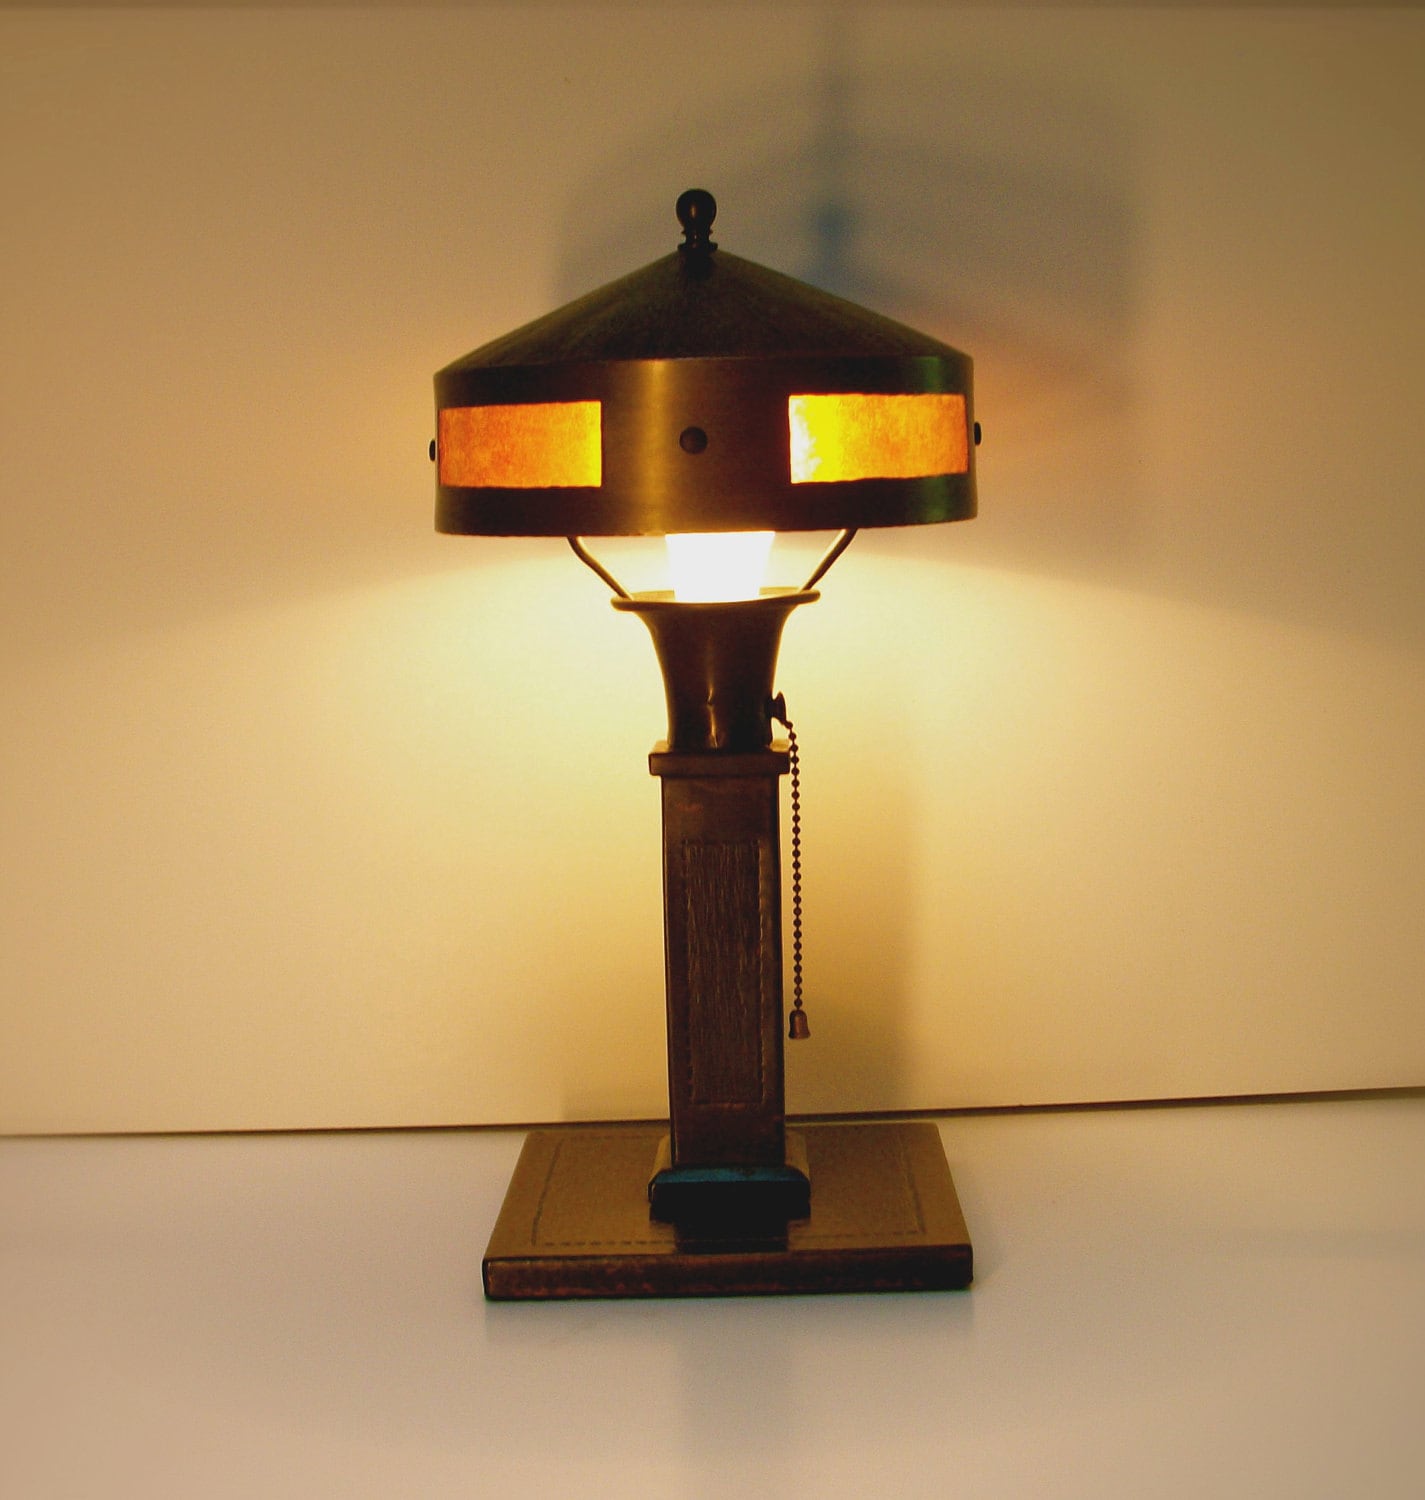
In the previous post we uploaded our first mesh lamp. Up close it looks just as we wanted but stepping away even a little the lamp melts into an indeterminate jumble of mangled mesh.

This is the same issue as we had with sculpts. The randomly generated lower LOD meshes are little better than the arbitrary chops applied to the sculpt maps. But we have more power now, with mesh we do not have to accept the manufactured mesh we can submit our own objects.

The LOD generation tool has some strengths here. By manually tweeking the settings we can influence the number of triangles at each level. in the preview window and work out more or less what our target should be for each model and thus set our expectations.
 
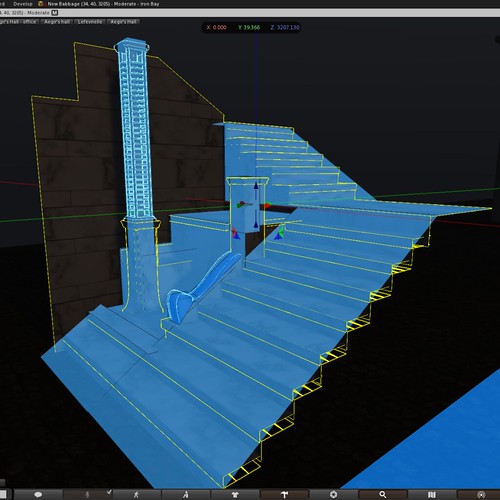
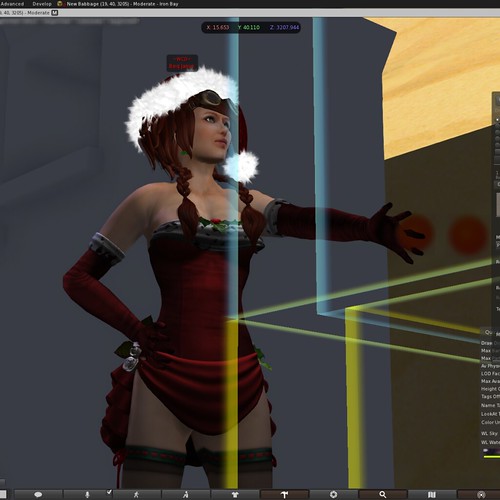
Here we have the mesh upload dialogue in Firestorm. We have loaded the Collada file of our lamp, and are generating all other LODs. In the preview window I am displaying the medium level of LOD. This is the level that most people will see if standing on the other side of the room, so it is important enough to focus on. This generated LOD is not ideal but its not awful, the form is more or less intact.
But wait a minute! Look at the Land Impact noted on the left hand side at the bottom.

This object would have a land impact of 9.323 prims, this would be rounded up to 10 prims.  The download impact is the highest of the three factors, Download, Physics and Server. Download represents the streaming impact and is for the most part defined by the number of triangles in the object. As mentioned in previous blog entries, triangles in the lower LOD models have a higher cost so by tweaking those settings we can drastically alter the streaming impact and drive down the Land Impact of the model.


In the image above we have altered the Triangle limit parameters for the generator to work with when constructing the lower LODs. By reducing the limits at each level we have managed to bring down the cost to 1.704 (2) prims.

That is much more like it! But look at the quality, the generated medium LOD is OK but its really starting to look a bit shabby. Its at this point where we can take advantage of  another one of the benefits that mesh has over sculpts; the ability to define explicit models for each of the LOD levels.

So let's look at our model and start to simplify it. We should keep in mind that the Medium level of detail can be seen from relatively close (the mathematics behind the distances for each LOD level is something I can cover in another blog, but for another explanation, in nice clear terms with no maths in sight, I highly recommend Loki's excellent blog).


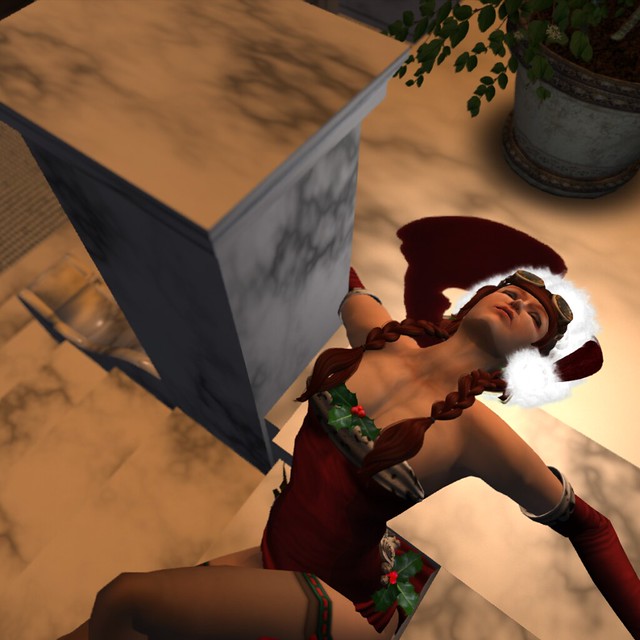
On the left is the high LOD model on the right is the reduced detail medium LOD model. The simplifications are quite straight forward. All of the surface details have been removed to give a plain rectangular column, I enlarged it slightly to the same volume as the external dimensions of the ribbing. The cross struts in the shade were simplified to square profiles not circular (Squares are much lower cost than circles) and that was about all. This does not seem like much of a simplification but we will also use the Mesh Studio tool to help us reduce the detail further.

When we generated the high LOD model we simply took the Mesh Studio defaults. Mesh Studio however has options to tune the way in which the prims are translated to mesh along with a number of useful presets. With the script installed in our medium model we can touch it to obtain a menu like the following

The default resolution shown above is 4/24. This tells us that straight paths (edges) will be rendered with 4 vertices whilst curves will have 24 sides. Clicking on the "Resolution" button takes us to a different dialogue where we can tune the resolution. For the medium resolution we will select the Low Poly option. This uses just two points per side to define a straight edge and 16 for a curve. The result for us will be a blockier curve to the lamp shade whilst saving over 1/3 of the vertices.

Having set the resolution we can return to the main dialogue and press the "Mesh!" button. A few seconds later a URL will be printed in to the local chat channel and opening that URL in your browaser will down load a zip file containing your collada mesh file exactly as we did for the high LOD model.

Before we upload anything we will continue to optimise.
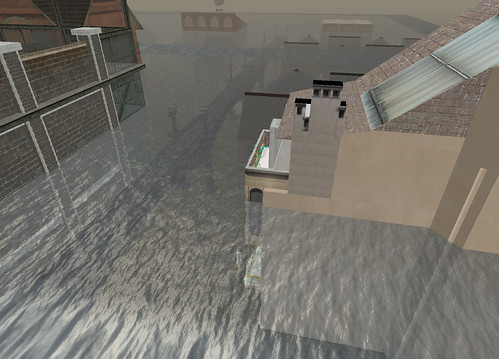
First we will create a low LOD model. At this stage we can expect the model to be being viewed from quite a distance and as such we can take some liberties with the model.

 The bulb inside the shade has been removed completely, there is a subtle issue here, that relates to the texturing (or materials in Mesh speak), we won't examine this in detail but take care to ensure that your models always show the same number of texture faces in the hover text before you generate the mesh. SL will not allow you to combine objects that do not have the same material structure.

Apart from the bulb, we have removed the cross members on the shade and made the bulb holder itself square. The apertures in the shade itself have been closed in.

In the illustration above you will notice that the inside of the shade is transparent. This is a nother feature of Mesh Studio. All faces that are 100% transparent are assumed to be hidden and will not have mesh generated for them. I have made the assumption that our lamp, when viewed from afar is likely tobe viewed from above and so the inside of the shade will be invisible.

For the final cost savings, we go back to the resolution settings dialogue in Mesh Studio.
We could have used the low LOD preset of 2/8 which would have rendered our lamp shade as an octagon, but because of its shape we can be pretty comfortable taking this down to 6 sides (a hexagon).

This leaves just one final LOD to define. Lowest.
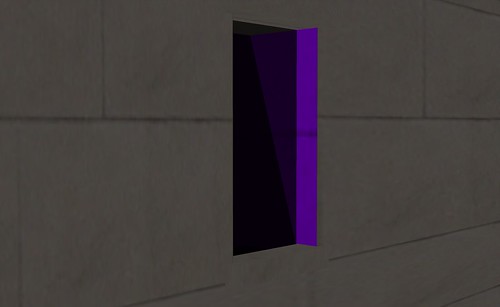
The Lowest LOD pays the highest price for each vertex so we need to keep this  as low as possible whilst still serving its purpose. In the case of our lamp I have arbitrarily decided that it will render as noth but a flat plane. As mentioned above I do need to have two texturable surfaces in order for Second Life to accept this model as part of the same mesh as the others.

 The image shows that I have reduce the model to a simple cube and set the four vertical faces to be transparent. the top and bottom faces (not seen here) are textured (one in brass and one in lightbulb) to represent our two materials.

We are no ready to upload.
 First step is as before, in our viewer we go to the mesh upload dialogue. For each of the four LODs we select "Load from File" and specify the appropriate model.
You may be surprised to note how many vertices we saved with the simplifications between the High and Medium levels alone. The Land Impact of our model is now down to 1.460, 2 prims still ,but we have defined an elegant set of models for each LOD now, and so we can look at the rest of the upload options.

Next we move on to the physics tab.
Another difference between mesh and sculpts is that you can specify a special physics shape, this is in the form of a mesh and adds to the overall cost of the model by affecting the "physics" weigfht shown in the dialogue above. The physics of the lamp is not very important and so I have specified the lowest LOD model as the physics. In this case it has not affected the overall cost of the object.
 Finally the "upload options" tab. This is where sundry options exist. To be honest I have played only a little with this, the key parameter here is scale. For ease of construction I was working on a large scale model. 3m high, a little on the large side for a table lamp.
Scaling is optional. Once uploaded you can scale the model inworld. The same Land Impact will be gained but by tweaking things in the dialogue we can see how the scale will affect our Land Impact before we upload and in some cases that might send us back to the modelling stage to make some additional tweaks, thus saving an upload fee.

By scaling this down by a factor of 0.5 we have a still oversized lamp but have already gained the lowest Land Impact (0.5). This means that a single lamp willcost us 1 prim, moreover two of them linked together would cost us 1 prim too!

Finally we hit the upload button and our mesh will be transferred to our inworld inventory.

In the next blog, we will look at LOD and compare our new mesh with the old sculpted lamp.

Monday 18 June 2012

The devil is in the detail

In the last post we concluded a rather arduous journey through the world of mesh and levels of details with what must have seemed a very terse and over simplified view of mesh creation using Mesh Studio.

To reiterate:-
  • With this completed we simply add the mesh studio script into the root prim 
  • Touch the object to get a menu.
    The menu tells us that this object will be created at high LOD, preserving all details, it also informs us that we have two texturable surfaces.
  • For now we can simply accept all these and click the "Mesh!" button.
    A few moments later a URL appears in the local chat window. 
  • Clicking the the URL will download a zip file containing a default texture to use and the Collada (.dae) model ready to be uploaded.
Well, yes it was short and to the point but in all honestly, for the high LOD mesh that we just created that really is all that there is to it.

So let's get on and upload this shall we?


This is the standard mesh upload dialogue. We are looking at the levels of detail tab.
The dialogue offers us 4 different levels of detail that we can load. we have to have all 4, and the system "kindly" creates the missing ones. We have only the one LOD model so we have loaded this as the high level. You can see that our model is made up of 4422 triangles. All of the other levels are generated by the SL uploader.

The SL uploader tries its best. But to be quite frank it is not very aesthetically aware. you can see that the medium LOD model that is displayed in the preview window is alrady showing signs of corruption. as soon as we step down to the lower levels it will decay into a mess.

What is more, we have calculated the land impact and it is coming out a 9.323, this mesh lamp is going to cost us 10 prims! less than the 40 for the pure rpim version but twice the 5 prims that the previous sculpted prim version cost. This cannot be right!

So how is the land impact calculated?

The truthful answer is..your guess is as good as mine. The overall algorithm is to my knowledge not public though I could well be utterly wrong in this regard.  However we do know the general principles.
In this case the land impact is 9.323, this is the largest of the 3 factors, download, physics and server.
Download is calculated by a weighted sum of the total number of traingles in the combined set of LOD models multipled by a random number that the Lab came up with (or something like that).

The fact of the matter is that triangles in the lowest LOD are REALLY expensive, having a much higher weighting than those in the next level up, which in turn have a much higher cost than the level above (medium) and the n in turn medium has a higher cost per triangle than the higest level of detail.

We can therefore mess arouns with the Triangle limit setting of the LOD generator to get a more acceptable land impact.


So here we have reduced the triangle counts for all the lower levels of LOD. Medium is now at 552, Low at 69, lowest at 17. Our object's land impact will now be 1.7 (aka 2 prims). this is great news.

We can hit upload and enjoy our mesh lamp. Except we now find of course that as soon as we pull away form the lamp the thing mangles up into the shape shown. We can set our graphics settings to forestall this but we cannot force others to do likewise.

"Surely there must be a better way?", I hear you cry.

There is, and we'll look at this in the next instalment, wherein we will look at generating specific models for the other LOD levels.


Friday 15 June 2012

Another fine mesh you've got me into Stanley

Before we start the lamp

As discussed previously, Mesh Studio converts a prim object to a mesh object. Happily I have a prim object for the lamp already. This is the beauty of this tool in fact. It will take all of your old primmy things and give them a mesh makeover, if you so desire. However, this is where we need to stop and take another quick look at the mechanics of mesh.

Not all meshes are created equal

Land Impact and Prim equivalence. Since mesh was introduced there have been two standards for prim accounting in Second Life. The old fashioned prim counting method and the new Land Impact (LI) accounting system.  In the old world of prim counting, A pathcut, hollowed, torus cost the same as a cube in term of prims, but to the viewer it is a far more complex shape to render (draw), the ultimate free lunch is probably the sculpted prim which for a single prim could define highly complex shapes.  A long explanation of why some shapes are more costly (and when I say costly I mean "laggy") is probably beyond the scope of this blog. However I will try to summarise the basic mechanism.

Every shape that you see in Second Life is in fact a Mesh in the more general sense. A simple cube is a made up of 8 points representing the corners of the cube and known as vertices, linked together by straight lines to form a cube. The "mesh" that we talk about when discussing the new features in Second Life is a way of representing an object, known as Collada, by using a special language to allow an object's shape to be described as a mesh or network of interconnected vertices.

If we can describe a cube in 8 vertices, it should hopefully be clear that describing a cylinder in terms of a number of points and lines is many times more complex (If I recall correctly the cylinder in Second Life is made up of 22 sides). Imagine then the relative complexity of describing a torus? Or an arbitrary sculpted prim.

With a sculpted prim you have a finite number of vertices to play with and a number of other constraints (the connections between vertices are predefined in a simple net-like structure, see below taken from the Second Life Wiki).

One thing we always knew with a sculptmap was that no matter what we did with those vertices the resulting shape would cost us one prim. This ignored the actual cost of rendering, and in effect even today you are getting a bit of a free lunch in terms of prim utilisation with a sculpted prim.

With Collada meshes we are set free from these constraint, there is no explicit limit on the number of vertices, there is no constraint over which vertices another vertex connects too, this makes for a vastly superior medium for representing shapes.

With great power comes great responsibility

Each triangle in your mesh has to be drawn on a screen "rendered", that takes time, the more triangles, the more complex the shape, the more time it takes to draw it. Take too much time to draw things and you start to slow down the frame rate.....also known as Lag!! So, if I can create an arbitrarily complex shape that would put unrealistic demands on the region it is clear that the griefing potential alone is cause enough for some constraints to be placed. The way that the Lab have chosen to do this is by introducing a new accounting method for mesh objects. A complex object will have a higher prim equivalence than a simpler object.

"But I've seen a drop dead gorgeous mesh sofa that costs only 2 prims", I hear you cry. Indeed you may have, and to explain this I need to talk about LOD.

LOD - Levels Of Detail

 Father Ted to Dougal: ...OK, one last time. These are small... but the ones out there are far away. Small... far away... ah forget it!
Remember the way that how you always used to be able to spot a sculpted object by the mangled mess of triangles that unfolded as you approached. This was down to LOD management. the theory is that there is no point putting the viewer to the trouble of rendering all 2048 triangles in your sculpty if it only fills 16 pixels on the horizon of your scene. With Sculpties the "low LOD" version were created in a very arbitrary manner. if you consider that an typical sculpt map might be defined by 32x32 image, then the medium LOD level was calculated by taking each alterate row and column reducing the map to 16x16, successively lower levels of LODS (8x8, 4x4) would be rendered as the object moved away from your point of view.

With Collada mesh LOD still exists and is still going to be cussed at by videographers and photographers however as designers we do have control over this.Instead of arbitrarily deciding what a lower LOD level looks like you are given the option to specify it by providing an alternative model to be used when the item is further away.

There are 4 LOD levels High, Medium, Low and Lowest.

What has LOD got to do with the number of prims though?

The Lab wished to introduce mesh but not have the performance of the system destroyed. They therefore came up with a complex algorithm to calculate not only the upload cost in Linden dollars but the prim equivalence. The exact mechanism is not clear however we know enough to establish some guidelines.

Sim performance is dictated by the number of triangles that are visible when rendering the scene, low LOD carries the highest cost per triangle. Why? Because the triangles in a low LOD model are potentially visible from anywhere in the region. High LOD on the other hand is only going to be seen up close and as that object will then take up more of the overall screen, its cost can be easily traded against the cost saved by not having to render the objects obscured by it.

As we specify our mesh models for upload the Lab calculates how much our models will cost as a ratio of the entire resources of the sim. Under the old rules you could have 15,000 prims per sim and thus if an object can be determined to be using more than 1/15000th of the overall resources of a sim then it should be treated as the equivalent of more than 1 prim.

Size matters

So that seems fairly straightforward right? the more complex an object at a given distance, the more impact it will be having, but it does not stop there. The size of an object is important this is because the LOD algorithm itself takes into account the size of the object before selecting a LOD level. e,g, over about 50m in size an object's full LOD is visible from anywhere in the sim. So larger objects will be having a higher impact across the sim and are therefore penalised as well.

This has been a rather long winded post and I am once again falling asleep at the keyboard. But we have not seen our lamp at all today so lat's put that to right and get out the high LOD lamp.

For those who appreciate design, the arts and crafts movement I apologise for the travesty that follows.

Building the High LOD lamp

Initially I simply recreated the lamp in prims giving it the details that had been added by the sculpt but not going much further. This came to about 15 prims. To help demonstrate how Mesh works though I wanted something more complex and so I created a number of additional details, the fluted edges, exposed bolt heads on the rim of the shade etc. The final high LOD version of the lamp is made up of about 40 prims.

Here is what it looks like

With this completed we simply add the mesh studio script into the root prim and touch the object to get a menu.
The menu tells us that this object will be created at high LOD, preserving all details, it also informs us that we have two texturable surfaces.
For now we can simply accept all these and click the "Mesh!" button. A few moments later a URL appears in the local chat window. clicking the the URL will download a zip file containing a default texture to use and the Collada (.dae) model ready to be uploaded.

To be continued.

Thursday 14 June 2012

Mesh creation inworld

Mesh is for most of us a pretty new thing. Designers working in offworld 3d are more familiar with the concepts but even then there are considerations and special nuances of the Second Life importer that need to be mastered.

I am going to document a quick project that I undertook this evening in the hope that some might find it useful and perhaps demystifying mesh a little. I should of course note that I am no expert in this field, mesh is a new tool for me and I have only just begun to play with it.

The very first Mesh creation I ever made was produced in Google's Sketchup program. This is a great 3d editing application with a wonderful interface that for the most part does what you expect. However, it is far from ideal for Second Life modelling and can be hard to import and certainly quite costly.

I moved on to Blender, and perhaps I will cover Blender in a later journal entry. I would certainly recommend Gaia Clary's videos on Mesh in Blender over at Machinimatrix but please bear in mind that she is still in the process of producing them and also that the version of Blender changed form her early tutorials.

Today though we will not be using Blender or in fact any offworld tool. Those of you who have produced sculpties in the past will almost certainly have come across the rather excellent Sculpt Studio by TheBlack Box (TBB). TBB has more recently been working with a number of other inworld tool visionaries, Anjin Meili and Inventor Alchemi who were previously involved in some of the ground breaking tools that proved that sculpts could be produced inworld.

The result of this work is Mesh Studio. In some ways Mesh Studio reminds me of another sculptie tool, Sculpt Crafter (SC) by Contagious Republic. SC worked by providing a set of prims each of which held a small script that would report the details of that prim and allow the main script to produce a sculpt map based upon the extents of the shapes. Mesh Studio (MS) takes that idea to a whole new level.

With MS you do not need special prims, there are no restrictions to how you can cut, slice or hollow them. To my knowledge any torture that you can apply can be reproduced by the tool. Neither do you need to have a script in each prim which makes the entire process far simpler. To enable you to build a mesh version of a prim object all you need to do is take a script that is provided and drop it into the root prim. The object then becomes touchable and produces a menu of choices for you, the most important being "Mesh!" which produces a link to a remote server which hosts a zip file in which your mesh has been stored.

Mesh uses a format known as Collada which typically carries a ".dae" suffix to its filenames.

Getting started.

So the aim of this series of entries is to use MS to produce a viable object and to learn as we go.
A long time ago I built a lamp. It was very simple and not very pretty but was based upon a real life lamp made in the early part of the 20th century by a movement known as "Roycroft" part of the Arts and crafts movement. The real lamp looked something like this.
 
 My version in Second Life was rather simple, deliberately low prim, and it pre-dated sculpts, or my ability to produce them at least. Just recently in a bid to reduce the prim usage in my undersea home in Babbage I took the opportunity to sculpt a redesigned lamp. The two lamps are shown below the orignal prim only version and the updated sculpt version.
The prim version was 8 prims, the sculpted version (made very simply with Sculpt Crafter) is just 3 prims and is actually more realistically structured, featuring support struts for the shade and a bulb.

The sculpted lamp is actually the booty in my bottle contributed to The Great New Babbage Bar Crawl.

A few days ago I discovered that Mesh Studio existed. It has been around a while it seems but I had managed to not notice its appearance. So I trekked over to the store and bought a copy, I used a few prim based items to experiment.

So today we are going to recreate the Roycroft lamp but as a mesh.

Can we beat 3 prims? Can we make it look better?

You will have to wait to find out I am afraid. Bedtime for Beq.


A new journal unlike the old

This journal has been sitting on my shelf for sometime but has had no purpose. One thing was always clear it would not be story based, but would be used to other effects. For the moment I think I am going to use it to record my adventures away from the role play, by which I think I mean building.

I have just begun my adventures into the wonders of Mesh, in particular.