Wednesday 29 June 2016

Meshing about in Blender with Python

Part 2 of my adventures in Blender add-on land

A short one tonight as I've been busy with RL annoyances.

In the last post on my Blender Journey when I stopped I had built my first ever Blender add-on, taught it to iterate through a list of selected items and for each one create duplicates that we can then mangle into lower LOD models.

At the moment the results of running it are as follows:-
In this example the High LOD model is shown first (it is two separate objects), the "Make LOD models from selection" button has been clicked, and the associated operator (blender term for function) has been executed. The result as shown is that the first five layers are populated. Layer zero (top left) has the original model, which we are treating as the High LOD. Next to this are layers one and two which contain lower detail models for Medium and Low. In this example, I had already made the models and by naming them appropriately, I allowed the script to find them and move them to the correct layer and not have it generate ones I did not need. Layer three contains a copy of the original renamed to Original_LOWEST and finally layer four includes another copy Original_PHYS. 

This immediately raises a few points. If I have a model for LOW then perhaps I should derive LOWEST and PHYS from that one. Perhaps I do not want a physics model at all.

Also, while my workflow would normally be to start with the High and work down there is often a good case for starting with the Medium and establishing the basic shape before adding smaller details to the High model. So maybe I should allow this too.

The image below is a quick mockup (from Gliffy) of how it could look


Each LOD/model has a row with a set of radio buttons to determine which LOD the selected object(s) should be treated as, and a set of tick boxes for the ones we want to be generated/found and moved. In this example the selected objects would be renamed with an _MED suffix. A copy would be made and any suffix removed, another copy with the _LOW suffix would be made. 

Having thought about the inheriting of LOD models I think it makes the most sense to do this automatically, so I will update the code to derive LOW from MED, LOWEST from LOW. This automatically means that models will inherit from pre-existing LOD models.

Updating the panel

It looks as if my visualisation was somewhat fanciful as Blender does not easily support radio buttons as a set (know better? Please tell me). It does, however, have an enumeration property type and this gives us a similar functionality.

Adding a properties class is a bit fiddly, or at least it seemed so. The result is quite simple, but the journey to getting there took me on more messy routes.
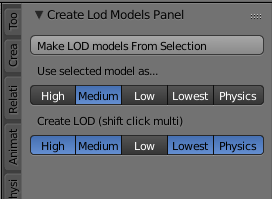
Here, however, is the final UI, which allows me to specify the source model and the targets to create from it.

import bpy

class LODModelProperties(bpy.types.PropertyGroup):
# This is how you make a static enum prop for the scene
    enum_items = (('0','High',''),('1','Medium',''), ('2','Low',''), ('3','Lowest',''), ('4','Physics',''))
    LOD_model_source = bpy.props.EnumProperty(items = enum_items)
    LOD_model_target = bpy.props.EnumProperty(
            name = "LOD Models required",
            description = "LOD Models to be generated",
            items = enum_items,
            options = {"ENUM_FLAG"}
        )    
        
bpy.utils.register_class(LODModelProperties)    

bpy.types.Scene.sl_lod = bpy.props.PointerProperty(type=LODModelProperties)

class CreateLODModelsPanel(bpy.types.Panel):
    bl_idname = "create_lod_models_panel"
    bl_label = "Create Lod Models Panel"
    bl_space_type = "VIEW_3D"
    bl_region_type = "TOOLS"
    bl_category = "SecondLife"
   
    def draw(self, context):
        layout = self.layout
        layout.operator("my_operator.make_lodmodels_from_selection")
        layout.label("Use selected model as...")
        layout.prop(bpy.context.scene.sl_lod, 'LOD_model_source', expand=True)
        layout.label("Create LOD (shift click multi)")
        layout.prop(bpy.context.scene.sl_lod, 'LOD_model_target', expand=True)


Right now, however, there is no linkage between them. In an ideal world, the target models would automatically exclude the source LOD selected.

We can achieve this using the get/set methods. It took me quite a while to figure this out.
It appears that the property itself is read only. You cannot apply a remove('1') to the set that represents that LODS to generate for example.
The solution is to maintain a parallel data value as a map entry on the property class.

def getter(self):
    return self['value']
    
def setter(self, value):
    if (value & self['src_value']):
        value ^= self['src_value']
    self['value'] = value
    

def source_getter(self):
    return self['src_value']
    
def source_setter(self, value):
    self['src_value'] = value
    if (value & self['src_value']):
        self['value'] ^= value

Now when we select a value in the source radio control, it is automatically removed from the target set if it is set, likewise trying to set it in the target will fail if it corresponds to the source.

That's it for tonight.
Next step is to use out new properties to control the generation because at the moment it still generates all 5 models.


Thursday 23 June 2016

Travelling with SL

Travelling with Second Life

Leaving building aside for a bit...
I am travelling for work at the moment. Earlier this year I upgraded my laptop to a Microsoft Surface Pro 4 from my old Sony Vaio and though I've travelled with it a few times I was too busy to be able to try using SL in earnest.

Just before I left, I encountered someone asking about the Surface Pro in a chat group (Builders' Brewery IIRC), I promised to write up my experiences. I am now 4 days in to a 7 day trip and I think I have enough data points to answer the question.

A bit of background

The Microsoft Surface Pro 4 (SP4) is a hybrid tablet/laptop replacement. It has a 12-inch high-resolution touchscreen (the resolution is about 2800x1800) and pressure-sensitive pen which is perfect for note taking and Photoshop, and a detachable keyboard. I chose it over some of the other offerings for the high quality build and the excellent pen. Overall the design is great and I have enjoyed owning it, with no real regrets on my choice.

Adjusting the Display

Surprisingly, it is the display that becomes an issue as soon as you try to run Firestorm. It is a really nice display and of a very high resolution for such a small physical size and this is ultimately where things get awkward.

The first sign of any problem is the login prompt at the bottom of the screen. A tiny slither of your screen is used to display the login details and on a physically small display this is practically unreadable.

There are however two quite simple steps that you can take to fix this.
Both are FireStorm configuration settings, and will need a restart of FS after.

The first is the font size:
Open the preferences dialogue and in the search box type "font size adj."
The font size adjustment option will be shown and highlighted in red
The maximum that can be set in the dialogue is 2.0.
If you want to go larger than this, then you can access the variable directly through the Debug Settings dialogue that can be found via the advanced menu.
Using the debug settings, find the FSFontSizeAdjustment setting and in here you can set it to any number but please note that large values (anything above 2) can start to cause wraparound and other display issues.

The display issues can be partly dealt with by growing the actual UI components. For this, we have another setting on the preferences menu.

Type "UI scaling" into the preferences search box.

Now that we have a workable Viewer the other concern is likely to be the graphics performance.

Graphical Goodness

I should note at this point that while the above steps should apply to all MS Surface Pro 4 models, the next section will vary depending on the specification of your machine.

In my case, I have the top end i7 16GB model. In practice, this means that the CPU has more oomph than some of the other models, and that I have lots of memory for it to use.

In my desktop at home, I run a relatively new NVidia 9xx series card, so I'm somewhat spoiled for frame rates. Having a dedicated graphics card is typically the single best thing you can do to make a machine run better. The SP4 does not have such an option and thus we are limited to the Intel onboard graphics ( Intel(R) Iris(TM) Pro Graphics 540 ) 

In the past, this would have been a pretty poor option, but I've been relatively impressed by their capability.

Letting Firestorm establish its settings for graphics shows the following:
As the image here shows, the default is a mid-range setting, which gives a respectable 25 fps in a moderate loaded scene. The spread shown here is not normally that wide; this appears to be an artifact of being pushed to the background while running the screen capture.

What I cannot comment on is how much, if any, impact the quality of the wifi in the hotel makes. In this case the Wifi had given me no problems all week, with a decent signal strength.

Most notable of the missing features is advanced lighting (ALM), this means that you do not see materials, or local light and shadow effects.

Enabling ALM will see an immediate drop to below 10 in a reasonably loaded region. However, it does seem relatively stable at the high single digits making it usable. I would suggest adding a toggle to the firestorm quick preferences dialogue to allow you to toggle ALM quickly on and off, very useful if you are taking photographs or want to see the full effect of a build but don't want to endure the slow down longer than you must. I was able to visit SL13B and survive, which shocked me if I am honest.

Shortcuts to make life easier

Adding a Quick preference is simple. Using the firestorm icon on the lower toolbar (right-hand corner by default) click to get the quick preferences menu.   From here, click on the spanner (wrench) icon.
You will now see a menu where you can add new items. Click the + to add a new entry, then type 'ALM' to name the function.

Just below the item name is a drop down. Type 'RenderDeferred' the menu of available items should quickly narrow down to the one tat we want.
Finally, select Type: to be a checkbox.
Close the dialogue with the X icon in the top right.

You will now have a quick preference toggle box for switching advanced lighting on and off.
Please note that while this does work I am not 100% convinced that it is entirely correct, once on and then off again I don;t think the frame rate ever fully recovers until restarted with the setting off
but it is better than nothing.

Summary

To round this up, the Surface Pro is adequate for working when mobile, but make sure your eyes are ready for small fonts.
From a performance perspective, the SP4 16GB i7 model is quite capable of running Blender and Photoshop and Firestorm. In fact, I am writing this blog with about ten chrome tabs open, MS Word, Firestorm, Photoshop and Blender all running all performing as well as I need.
From a usage perspective, Blender, in particular, can be tricky with the tiny UI. Knowing Blender, I don't doubt that I can get the UI to scale the font by tweaking the settings. Photoshop fairs very well, with nice clean, readable menus and pen input that make it very pleasant to use.

I cannot claim that the SP4 is an excellent SL machine, it is not, and you really do need a decent 3rd party graphics card to achieve that, however, for travel use it is more than adequate for my needs.

I hope that this helps.

regards

Beq

Monday 13 June 2016

Adventures in Blender scripting - automating workflow

Blender Addons

I have decided to have a go at writing a Blender Addon to ease my Second Life Mesh development workflow.

I will approach this in a modular manner hoping to learn a lot about both Python and Blender as I go.

When I build in Blender I tend to either start with a Mesh Studio model and perhaps generate a series of LODs using that tool or create a High LOD model and duplicate it for the lower LODs. Having duplicated them I can then set about reducing the complexity.

The first task is to create a simple operator to take a selected objects and create duplicates that will be used as the Medium, Low, Lowest and perhaps even Physics meshes.