Einstürzende Neu "Babbage" bauten
A bad play on words to start a long blog :-)When I walk around my beloved New Babbage I see far too many new Mesh buildings that collapse into a garbled mess as soon as I put my settings to anything close to that of a default user. Older buildings that are sculpted I can understand but with Mesh there is not really a good excuse.
So ask yourself, are you guilty of not paying attention to the "other" LOD models?
One of the drivers towards this is keeping low LI and an assumption that creating a proper LOD model away from the HIGH LI is both a lot of work and costly in terms of LI. In this short series, we will discuss a recent project and some of the strategies I used to meet a low LI target and ensure that the object remains visually consistent but more important a viable solid silhouette at a distance. It is not going to be an all answers guide to efficient building, and I am in no way the right person to write such a thing but hopefully you will see, through my recorded pain, how you might tackle a challenging build, achieve respectable LI and preserve credible LOD behaviour.
For an older guide to creating your own LOD models, especially those using Mesh Studio, might want to take a look at my 2012 blog Too much information - making your own LOD models
About LOD and how it is observed
As the above blog explains the LOD that will be displayed is governed by the radius of the object and the distance of the observer from it. But that is not the full story; there is a multiplier that can be applied that makes the LODs appear at a higher resolution for more of the time. This setting is known as the LOD Factor (aka RenderVolumeLODFactor).Once upon a time, setting your RenderVolumeLODFactor as high as your viewer allowed was standard practice, you can still buy outfits whose associated readme tells you to do this to maximise your experience.
Managing Level Of Detail is still considered a dark art by many. I see far too many Mesh builders, both experienced and new that don't understand the factors that control when LOD changes or perhaps more worryingly choose to forget that most people in SL don't touch their Advanced Graphics settings. Building with low LI is easy if you don't care what it looks like to others, however, when building for architecture, anything that is going to be seen outdoors, in particular, careful attention to the LOD levels is very important to the overall quality of your build.
What should we be aiming for?
LOD
|
Primary goal
|
Bullet points
|
HIGH
|
Close up. Full detail. This is the only mandatory model.
|
|
MED
|
This is arguably the most important Model. It will be seen by most of the people most of the time.
|
|
LOW
|
This is only ever seen at a distance, it is important that the general silhouette maintains the volume of the build to stop the "crumple" effect
|
|
LOWEST / IMPOSTER
|
The last of all. This is very hard to deal with as a model and often the imposter solution is best.
|
|
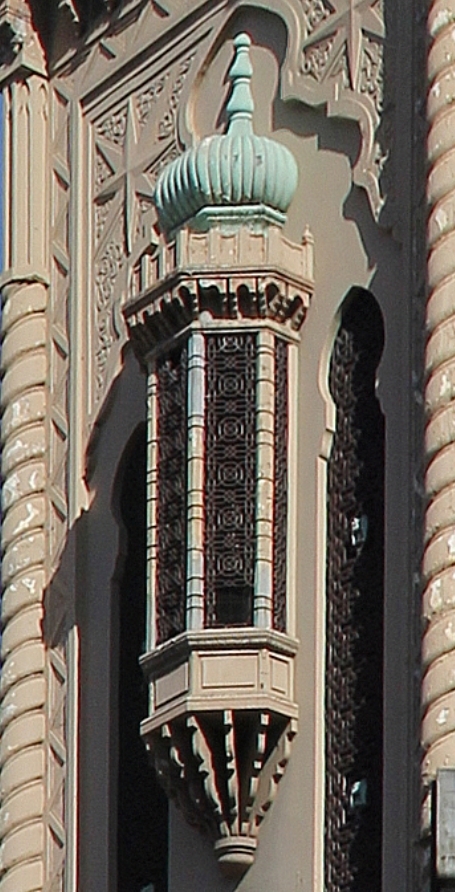
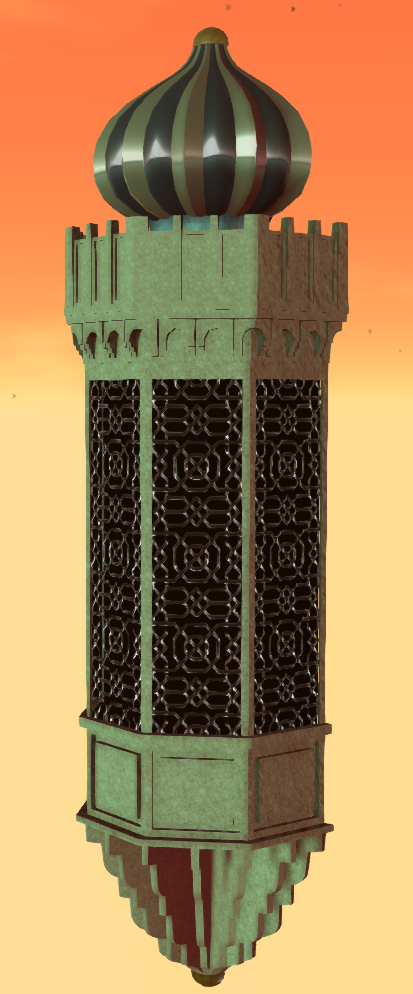
An arabesque challenge
I recently undertook a request from a friend who is busily rebuilding his property in New Babbage.He desired an arabesque bay window, modelled after a theatre in Melbourne.
"No problem", I said. "what does it look like"
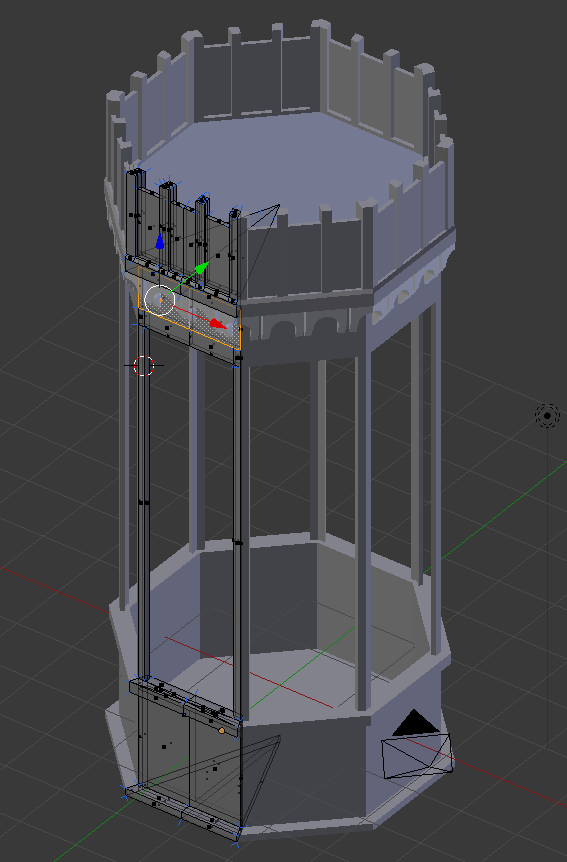
I often start a build in Mesh Studio but as I have been putting effort into my new workflow tools lately I decided to make this from scratch in Blender, so I set to work making an octagonal frame that I'd halve later.
I had of course forgotten two very important questions. "How big is it and how many LI do I have to play with?"
The answer came back the next day, it would need to be 9.5m high, 2m wide and about 1.5m deep,
"OK, that seems reasonable, what about the land impact budget..."
"About 2LI?"
"ookkkay." I said not wishing to give up without at least trying.
You may recall from previous blogs that the LI calculation is impacted by the scale, moreover, the issue is compounded by the realistic distance that an object will be seen from, and by whom.
If you are making a desk lamp, that will only ever be seen within your tiny office, and only ever seen by yourself, then you can take all manner of shortcuts that ignore the lower LODs and assume that the viewer has adjusted their viewer LOD multiplier etc.
In this case, though, we have a perfect storm of LOD and LI demands.
- Reasonably large in scale
- Visible from a distance as it is an external component.
- Seen by any visitors to the sim whose viewer settings cannot be "presumed"
- It needs to be low LI.
Large size means that the triangle rich HIGH LOD will be visible for a larger distance and this will put up the cost. The biggest cost is, however, going to be the MED LOD which will be visible across a very large part of the region, and thus is going to need to look pretty good.
You don't need to do this to achieve results.
I find measurement is the best way to track your progress but that's just me. You can of course try these things on your objects and see how you get on without needing to measure every deatil.
Let's do some quick maths then....no let's not, I wrote an AddOn for this...
Advice for the faint hearted
The following section *is* very long winded. It is about driving down the LI from an initial 15+ LI trial upload to the low target of just 2LI. I'll show you the working and comparisons but..You don't need to do this to achieve results.
I find measurement is the best way to track your progress but that's just me. You can of course try these things on your objects and see how you get on without needing to measure every deatil.
Thinking about budget.
Let's do some quick maths then....no let's not, I wrote an AddOn for this...
Using a Cube of the right dimensions we find the following information
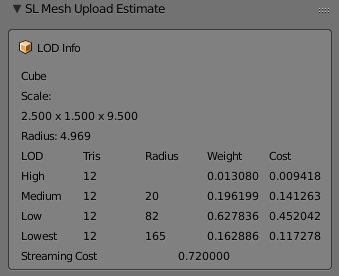
A radius of almost 5m means that our HIGH LOD model will be visible to the default user setup within 20m. Now given that this is nearly 10m high and will sit on the side of a hotel, we can assume that many users will be seeing it from further than 20m away. So as we suspected the MED LOD needs to look good. What's more, the LOW LOD will kick in at 82m. Now this is New Babbage, visibility of 82m is unheard of but we can expect people to want a viable silhouette, so we'll have to make some effort on the LOW LOD too.
We know that my plugin values for the cost are over estimating but the proportions are probably not far off. Triangles in the MEDIUM are going to cost about 15 times that of the HIGH, with the LOW costing 3 times that of the MEDIUM
In fact, we can check this using an inworld analysis script.
Radius Total LI HIGH LOD MED LOD LOW LOD LOWEST LOD
4.968652 0.729080 0.154618 0.348042 0.216630 0.009789
LOD sizes in tris : 197 30 6 1
LOD sizes in bytes: 3536 857 476 400
Cost per tri(LI) : 0.000785 0.011773 0.037674 0.009767
We see that the ratio between LODs at that scale is:
HIGH/MED 15:1
MED/LOW 3:1
We can also see that our budget of 2LI is going to be tough.
SL rounds down so we can creep up to 2.5.
2.5LI is 3571 triangles in HIGH LOD.
For every triangle we put in the MEDIUM LOD we must sacrifice 15 in the HIGH
For every triangle in the LOW LOD we must sacrifice 45 in the HIGH
What is more, we are working on a symmetrical Mesh, every triangle we place on one wall becomes 4 in the final mesh so our full budget per wall is 892.
Making a start
I'd started with an octagon using 3 mirror modifiers to take a single face and reflect it up into 8. The idea would be to make the octagon then slice it in two. Very quickly I realised this was the wrong path (slicing a mesh in half is always best avoided) and instead switched to using array modifiers.
The model is built to be relatively efficient. All normal first stage optimisations have been made. The two most common for me are:-
I modelled the main body, the crenellations, the dome and the lower corbel separately merging them into the joined model. The result was as follows:-
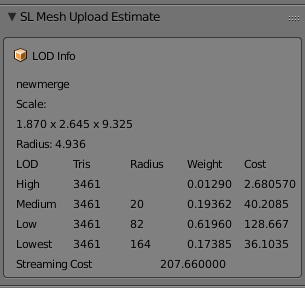

3461 Tris in my HIGH LOD Mode and coming in at around 3LI, now with the error in my AddOn we can suspect that this would be about 30% less. so perhaps 2LI, which will leave us nothing at all for the MED LOD. We are going to need to do some serious work to hit our target and frankly, I don't want to lose any of the detail I have if it can be helped.
The model is built to be relatively efficient. All normal first stage optimisations have been made. The two most common for me are:-
- Remove hidden faces.
This applies to any mesh creating workflow, when you work in Mesh Studio you do this before creating the Mesh by setting the face to be transparent. With Blender, a similar process can be applied. MY method is to create a "fake" material face could DELETEME, assigning any that faces that I find which cannot be seen as I go, deleting them later in the workflow. - Remove duplicate vertices
As you work you often end up with overlapping mesh and blender has a convenient function to remove duplicates. It has a slider to control the threshold (how near they must be) which is great for tidying up messy joints, but it needs to be applied with care or you'll lose small details by mistake. This is also a job that can take place numerous times in a workflow. For Example, if you apply modifiers, especially mirror or array modifiers, you may get duplicates left.
I modelled the main body, the crenellations, the dome and the lower corbel separately merging them into the joined model. The result was as follows:-
Breaking it up - Bespoke optimisation
So what can we do? We've already done the basic stuff. We have a clean looking mesh, we removed all the doubles. So we now need to look at item specific tactics, is there anything about this object that we can use to our advantage?
If we look at the object we notice a number of things. The main body is quite plain. I modelled the fretwork for the window but only used it to generate the textures and bump maps, apart from that it is really just a few inset panels. The crenellations are far more detailed with a curved and stepped arch. Then we have the dome, At first, I reused the old Aurora dome but quickly decided to recreate it from the start, either way, it has to have smooth curves and they are costly. At the bottom end we have the curved corbel another comparatively costly piece.
If we look at the object we notice a number of things. The main body is quite plain. I modelled the fretwork for the window but only used it to generate the textures and bump maps, apart from that it is really just a few inset panels. The crenellations are far more detailed with a curved and stepped arch. Then we have the dome, At first, I reused the old Aurora dome but quickly decided to recreate it from the start, either way, it has to have smooth curves and they are costly. At the bottom end we have the curved corbel another comparatively costly piece.
By linking all of these into one we are paying the price of a 5m radius object when by separating them out we van get those same triangles cheaper. Will it make a major saving?
Let's have a look.
LOD
|
HIGH tris
|
Radius
|
Cost
|
Notes
|
Combined
|
3461
|
4.94
|
2.680
|
All 4 parts joined and dupes removed
|
Dome
|
787
|
1.58
|
0.062
|
|
Crenellations
|
1650
|
1.77
|
0.164
|
|
Bay Window
|
276
|
2.82
|
0.069
|
|
Corbel
|
784
|
1.65
|
0.067
|
|
Separates Total
|
3497
|
0.362
|
Notice the slightly higher tri count.
|
So why would we ever join the mesh? The combined mesh has a couple of things in its favour.
Feature
|
Joined
|
Separate
|
Server Cost
|
Always 0.5
|
0.5 for each unit. In our case 0.5 x 4 gives us 2LI Inside out target so perfectly acceptable.
|
Texturing
|
Eight texture faces
|
Eight faces per unit. A lot more work perhaps. Also a lot more flexibility
|
Upload cost
|
Not really sure this matters
|
What's a few Lindens between friends?
|
LOD switch
|
A biggy. The LOD will switch based on the BB of the single unit
|
The LOD will switch independently for each item. This is good and bad. It can mean that the larger features stay as HIGH for longer than the small features. All the more reason to design good quality LOD models
|
LOD calculation
|
The crux of this issue. All triangles are going to be costed at the size of the overall object. Imagine a full-scale house with a mesh door knocker.
|
With the parts separated into sensible chunks we pay a more appropriate price and can choose where to place out details. This has worked incredibly well on our broken up window the High LOD coming in at about 13% of the merged
|
So what have we achieved, so far?
We had a hard target to hit at 2LI for a large and potentially fiddly mesh. My first "sketch" was coming in at 15LI with no other LODs and that seemed to suggest a big problem ahead. But by the time we've sanitised the Mesh to just what we needed and nothing more we were down to the low single digits.
We then made use of the fact that this object has some large flat expanses that unhelpfully push up the scale. Breaking that down we have now reduced out HIGH LOD exposure to less that half an LI. Leaving us up to 2LI (remember LI gets rounded to the nearest whole so we can go to 2.5) for the remaining LODs.
The bad news is that because we have broken this into smaller parts we now need to consider that the LOW LOD might be seen from nearer than before and a larger budget might be needed there.
Coming soon...
Next up we will look at the MED LOD model and see how we can keep our design goals and our LI budget aligned.